Microsoft Teams is the University's standard platform for online meetings and teaching sessions.
- Download Microsoft Teams
- Using Teams on a mobile device
- Join a Teams teaching session
- Join another Teams meeting
- Set up your own Teams meeting
- Record a Teams meeting
- Save your Teams meeting recordings
- Transcribe a Teams meeting
- Get more help with Teams
Download Microsoft Teams
You can download Microsoft Teams on a Windows or Mac computer.
- Download Microsoft Teams.
- Download and install the app for your device.
- Open Teams and sign in with your Herts account.
Microsoft also confirms that Teams can be accessed through a web browser without installing the app.
Using Teams on a mobile device
You can download the Microsoft Teams app from the iOS App Store or Google Play Store.
Sign in using your username@herts.ac.uk and password and choose your work or school account.
Using a mobile phone for taught sessions and meetings with lecturers is not recommended because of the smaller screen and the experience when sharing your screen or camera.
If you do not have your own computer or laptop, you can use a computer in the LRCs.
Join a Teams teaching session
For Teams meetings organised by your lecturer as part of your course, you'll find the meeting link in Canvas, either within your module pages or the Teams option on the module menu.
- Select the meeting link.
- Open the meeting in the Teams app or continue in your browser.
- Sign in with your Herts username and password when prompted.
Do not join as a guest. Your sign-in information may be used to record attendance on your course.
Join another Teams meeting
For a Teams meeting that is not part of your course, such as one organised by another student:
- Go to Calendar in Teams.
- Select the meeting.
- Select Join.
See Microsoft's guidance on joining a Teams meeting
Set up your own Teams meeting
In Teams:
- Go to Calendar.
- Select New meeting.
- Add the meeting details and attendees.
- Schedule your meeting.
You can find more help with meeting functions through Microsoft 365 help and learning.
Record a Teams meeting
You can record Teams meetings that you organise yourself and manage the meeting roles of the people you invite.
Before recording a meeting or session:
- ask everyone in the meeting for permission to record
- make sure participants are aware that the meeting is being recorded.
Teams displays an indication when a meeting is being recorded.
If the meeting is organised by a member of staff, you will not be able to record it.
Useful guidance:
Save your Teams meeting recordings
Recordings are automatically saved to the organiser's OneDrive in line with the University's recording retention policy.
The current retention period stated by the University is:
- 70 days in OneDrive
- plus 90 days in the recycle bin
Delete recordings from OneDrive when you no longer need them.
You will lose access to your University OneDrive six months after the end date of your course, so save any recordings or other files you want to keep somewhere else before your access ends.
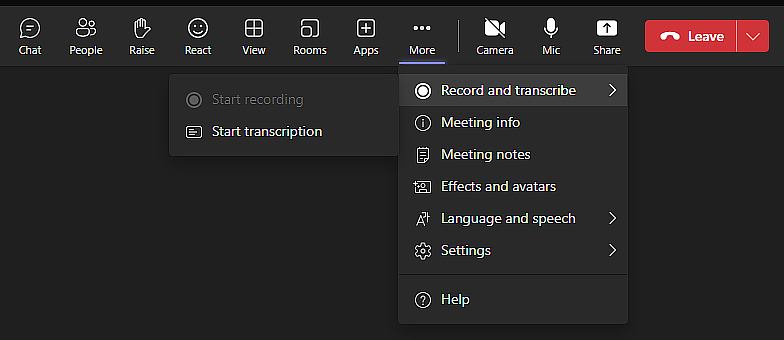
Transcribe a Teams meeting
You can transcribe a meeting using Start transcription from the Record and Transcribe options in the meeting controls.
When transcription starts, meeting participants can see a live text transcription with speaker attribution. A transcript can also be downloaded after the meeting.
Get more help with Teams
Microsoft provides guidance to help you use Teams features, including changing your profile picture, meeting backgrounds and other meeting functions.
Useful resources: